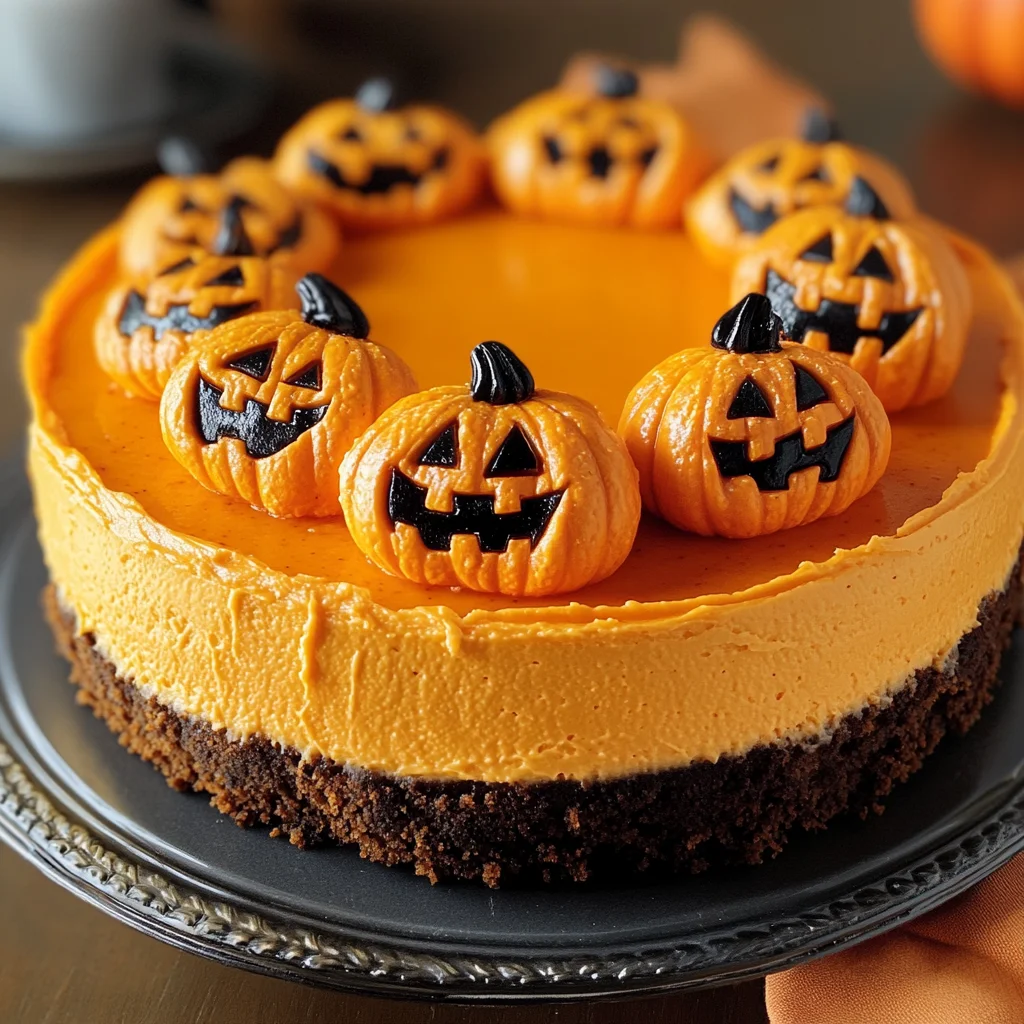
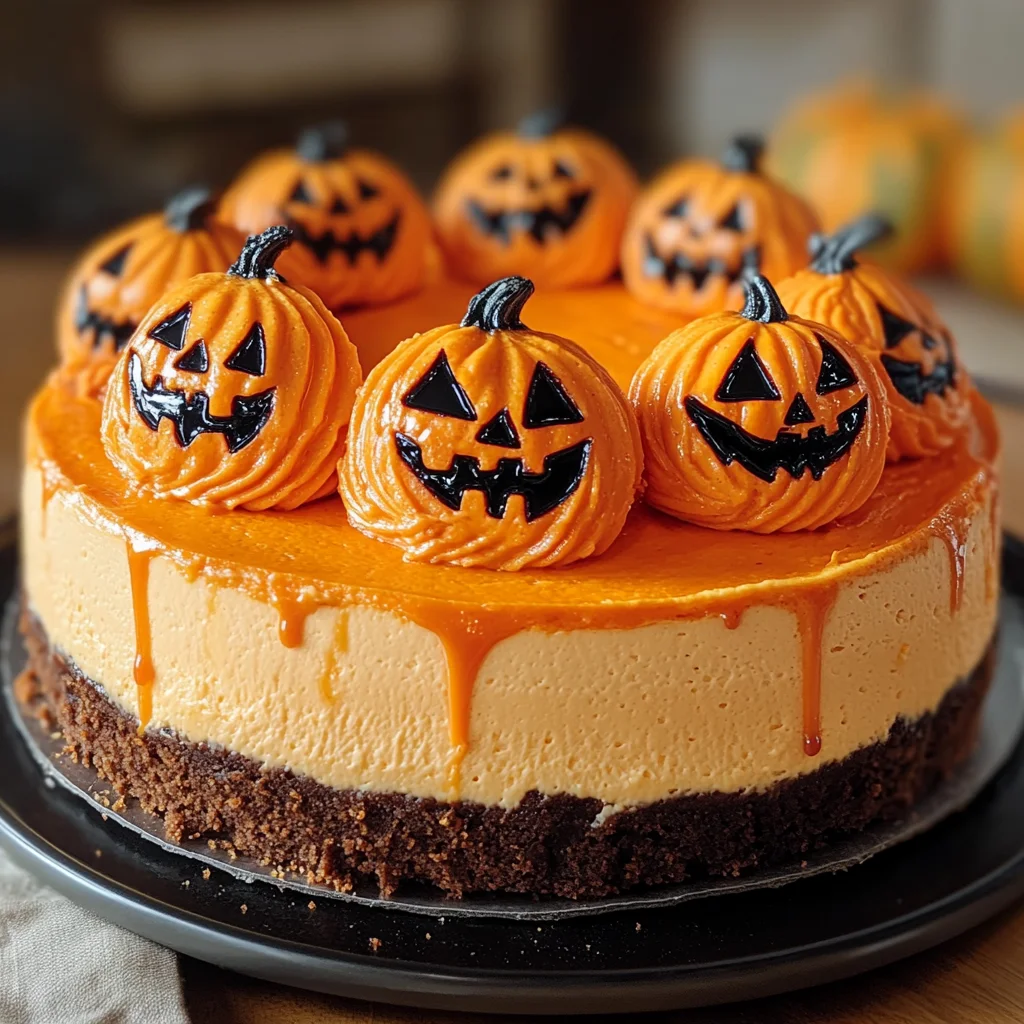
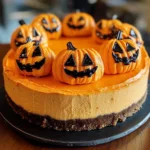
Glowing Jack-O’-Lantern Cheesecake
Bigger, bolder, and brighter! The Glowing Jack-O’-Lantern Cheesecake is a delightful dessert that will light up your Halloween celebrations. This pumpkin-spiced cheesecake features a rich cream cheese base, a glowing orange frosting, and playful Jack-O’-Lantern faces that make it perfect for any fall gathering or festive occasion.
Why You’ll Love This Recipe
- Deliciously Unique: The combination of pumpkin spice and maple syrup gives this cheesecake an unforgettable flavor.
- Visually Stunning: Its bright orange frosting and fun decorations make it the star of any dessert table.
- Versatile Serving Options: Ideal for Halloween parties, family gatherings, or just a sweet treat at home.
- Easy to Make: With straightforward steps, even novice bakers can create this show-stopping dessert.
- Feeds a Crowd: This recipe yields 24 servings, making it great for big events or leftovers to enjoy later.
Tools and Preparation
To create your Glowing Jack-O’-Lantern Cheesecake, you’ll need some essential tools for the best results.
Essential Tools and Equipment
- Springform pans
- Mixing bowls
- Electric mixer
- Rubber spatula
- Measuring cups and spoons
Importance of Each Tool
- Springform pans: These allow easy removal of the cheesecake without damaging its beautiful shape.
- Electric mixer: A must for achieving a fluffy cream cheese mixture effortlessly.
- Rubber spatula: Perfect for folding in ingredients smoothly without deflating the batter.
Ingredients
To whip up your delicious Glowing Jack-O’-Lantern Cheesecake, gather the following ingredients:
For the Crust
- 3 cups graham cracker crumbs (or mix with crushed gingersnaps for extra spice)
- ½ cup melted butter
- Optional: 1 tbsp brown sugar for richness
For the Cheesecake Filling
- 48 oz cream cheese, softened
- 2 cups sugar
- 2 cups canned pumpkin purée
- 6 large eggs
- 2 tsp vanilla extract
- 2 tsp pumpkin spice
- 1 tbsp maple syrup (adds depth!)
- Optional: ½ cup sour cream for added creaminess
For the Decoration
- 2 cups orange frosting (store-bought or whipped buttercream)
- Black gel icing for decorating faces
- Optional: green frosting for stems + edible gold dust for shimmer
How to Make Glowing Jack-O’-Lantern Cheesecake
Step 1: Preheat the Oven
Preheat your oven to 325°F (165°C) to prepare it for baking.
Step 2: Prepare the Crust
- In a mixing bowl, combine graham cracker crumbs and melted butter. If desired, add brown sugar.
- Press this mixture firmly into two springform pans.
- Bake in preheated oven for 8 minutes. Remove from oven and let cool completely.
Step 3: Make the Cheesecake Filling
- In a large bowl, beat softened cream cheese and sugar together until fluffy.
- Gradually blend in canned pumpkin purée.
- Add eggs one at a time, mixing well after each addition.
- Stir in vanilla extract, pumpkin spice, maple syrup, and optional sour cream until fully combined.
Step 4: Bake the Cheesecakes
- Pour the cheesecake filling evenly into each cooled crust.
- Smooth out the tops with a spatula.
- Bake in the oven for 55–65 minutes until edges are set but centers slightly jiggle when moved.
Step 5: Cool and Chill
Allow cheesecakes to cool fully at room temperature before transferring them to the refrigerator to chill for at least 4 hours or overnight.
Step 6: Decorate Your Cheesecakes
- Once chilled, spread orange frosting over each cheesecake evenly.
- Use black gel icing to pipe fun or spooky Jack-O’-Lantern faces on top.
- For added flair, consider decorating with green frosting vines or sprinkle with edible gold dust.
Now you have an impressive Glowing Jack-O’-Lantern Cheesecake that’s not only delicious but also visually captivating! Enjoy sharing this festive treat with friends and family!
How to Serve Glowing Jack-O’-Lantern Cheesecake
Serving your Glowing Jack-O’-Lantern Cheesecake can be as fun as making it! This dessert is perfect for Halloween gatherings, and there are various creative ways to present it that will impress your guests.
Festive Platter
- Arrange slices of cheesecake on a colorful platter with Halloween-themed decorations, like small pumpkins or spooky confetti.
Individual Portions
- Serve mini cheesecakes in clear cups topped with orange frosting and Jack-O’-Lantern faces for an adorable presentation.
Pair with Whipped Cream
- Offer a side of whipped cream to complement the rich flavors of the cheesecake. You can even add a sprinkle of pumpkin spice!
Accompany with Coffee or Tea
- A warm beverage like spiced coffee or herbal tea pairs wonderfully with the cheesecake, enhancing its seasonal flavors.
Add a Fruit Compote
- Drizzle a fruit compote made from berries or citrus over the cheesecake to add a tart contrast to the sweetness.
Create a Cheesecake Bar
- Set up a cheesecake bar where guests can customize their slices with toppings like crushed cookies, nuts, or additional frosting.
How to Perfect Glowing Jack-O’-Lantern Cheesecake
To achieve the perfect Glowing Jack-O’-Lantern Cheesecake, consider these helpful tips. They’ll ensure that your dessert turns out deliciously every time!
- Use Room Temperature Ingredients: Ensure that cream cheese and eggs are at room temperature. This allows for better mixing and a smoother texture.
- Don’t Overmix: Mix just until combined to prevent incorporating too much air, which could result in cracks during baking.
- Bake in a Water Bath: To keep the cheesecake moist and prevent cracks, place your springform pans in a larger pan filled with water while baking.
- Cool Gradually: After baking, let the cheesecakes cool in the oven with the door slightly ajar. This helps avoid sudden temperature changes that can cause cracking.
- Chill Overnight: For best results, chill your cheesecakes overnight before serving. This enhances flavors and improves texture.
- Decorate Last Minute: Frost and decorate just before serving to maintain the freshness and appearance of your Glowing Jack-O’-Lantern Cheesecake.
Best Side Dishes for Glowing Jack-O’-Lantern Cheesecake
Pairing side dishes with your Glowing Jack-O’-Lantern Cheesecake can elevate your dessert experience. Here are some delightful options:
- Spiced Apple Cider: Warm apple cider infused with cinnamon and cloves makes for a comforting drink that complements the spiced cheesecake.
- Pumpkin Soup: A creamy pumpkin soup served in small cups provides a savory balance to the sweetness of the cheesecake.
- Candied Nuts: Offer an assortment of candied pecans or walnuts for guests to snack on alongside their dessert; they add crunch and richness.
- Cheese Board: A selection of mild cheeses paired with crackers creates an elegant contrast to the sweet flavors of the cheesecake.
- Chocolate-Dipped Strawberries: These sweet treats add freshness while their chocolatey goodness pairs well with pumpkin spice notes.
- Roasted Root Vegetables: Serve seasonal roasted vegetables as a savory side dish that brings warmth and earthiness to your Halloween table.
- Ginger Snap Cookies: These cookies echo the flavors within the cheesecake while providing an extra crunch that guests will love.
- Caramel Popcorn: Lightly sweet popcorn drizzled with caramel offers a fun, crunchy snack that appeals to both kids and adults alike!
Common Mistakes to Avoid
Making a delicious Glowing Jack-O’-Lantern Cheesecake can be daunting, but avoiding these common mistakes will help ensure success.
- Bold crust: Skipping the crust or not pressing it firmly can lead to a crumble. Always press the mixture into the pan evenly for a sturdy base.
- Bold mixing: Over-mixing the filling can introduce too much air, causing cracks. Mix just until ingredients are combined for a smooth texture.
- Bold baking time: Not monitoring the baking time may result in an undercooked or overcooked cheesecake. Check for doneness by looking for a slight jiggle in the center.
- Bold cooling: Cutting into the cheesecake while warm can ruin your presentation. Allow it to cool fully before chilling in the fridge.
- Bold decoration: Forgetting to decorate can make your cheesecake less festive. Use black gel icing and orange frosting to create fun designs.
Storage & Reheating Instructions
Refrigerator Storage
- Store in an airtight container.
- Enjoy within 5 days for best flavor.
Freezing Glowing Jack-O’-Lantern Cheesecake
- Wrap tightly in plastic wrap and then foil.
- Freeze for up to 3 months for optimal freshness.
Reheating Glowing Jack-O’-Lantern Cheesecake
- Oven: Preheat to 250°F (120°C) and heat slices for about 15-20 minutes.
- Microwave: Warm individual slices on low power for about 30 seconds.
- Stovetop: Place slices in a skillet on low heat, covering with a lid for even warming.
Frequently Asked Questions
Here are some commonly asked questions about making Glowing Jack-O’-Lantern Cheesecake that may help you along the way.
Can I use fresh pumpkin instead of canned?
Yes, you can use fresh pumpkin purée. Just ensure it’s well-cooked and blended until smooth.
What if I don’t have cream cheese?
For a lighter version, you can substitute with mascarpone cheese, which will still yield a creamy texture.
How do I prevent cracks in my cheesecake?
To prevent cracks, avoid over-mixing and ensure that your oven temperature is accurate. Using a water bath during baking can also help maintain moisture.
How long does the Glowing Jack-O’-Lantern Cheesecake last?
When stored properly, this cheesecake lasts up to 5 days in the refrigerator or up to 3 months in the freezer.
Final Thoughts
The Glowing Jack-O’-Lantern Cheesecake is not only visually stunning but also bursting with flavors perfect for Halloween celebrations. Customize it further with different toppings or flavors to suit your taste. Try this delightful dessert and watch it become a favorite at your table!
Glowing Jack-O’-Lantern Cheesecake
Indulge in the festive spirit of Halloween with this delightful Glowing Jack-O’-Lantern Cheesecake. This creamy pumpkin-spiced cheesecake features a luscious cream cheese filling and is adorned with vibrant orange frosting, complete with playful Jack-O’-Lantern faces that will enchant guests of all ages. Perfect for Halloween parties or autumn gatherings, this dessert not only captivates the eyes but also tantalizes the taste buds with its unique blend of flavors. Easy to make, this cheesecake yields 24 mouthwatering slices, ensuring everyone can enjoy a piece of this seasonal treat. Get ready to impress your friends and family with your baking skills!
- Prep Time: 30 minutes
- Cook Time: 65 minutes
- Total Time: 1 hour 35 minutes
- Yield: 24 servings 1x
- Category: Dessert
- Method: Baking
- Cuisine: American
Ingredients
- 3 cups graham cracker crumbs
- ½ cup melted butter
- Optional: 1 tbsp brown sugar
- 48 oz cream cheese, softened
- 2 cups sugar
- 2 cups canned pumpkin purée
- 6 large eggs
- 2 tsp vanilla extract
- 2 tsp pumpkin spice
- 1 tbsp maple syrup
- Optional: ½ cup sour cream
- 2 cups orange frosting
- Black gel icing
- Optional: green frosting, edible gold dust
Instructions
- Preheat the oven to 325°F (165°C).
- Combine graham cracker crumbs and melted butter in a mixing bowl; press firmly into two springform pans. Bake for 8 minutes and let cool.
- Beat softened cream cheese and sugar until fluffy; blend in pumpkin purée, adding eggs one at a time. Stir in vanilla, pumpkin spice, maple syrup, and optional sour cream.
- Pour filling into cooled crusts and bake for 55–65 minutes until edges are set; allow to cool before chilling in the refrigerator for at least 4 hours.
- Decorate with orange frosting and black gel icing for faces before serving.
Nutrition
- Serving Size: 1 serving
- Calories: 290
- Sugar: 20g
- Sodium: 210mg
- Fat: 17g
- Saturated Fat: 10g
- Unsaturated Fat: 6g
- Trans Fat: 0g
- Carbohydrates: 30g
- Fiber: 1g
- Protein: 5g
- Cholesterol: 80mg